

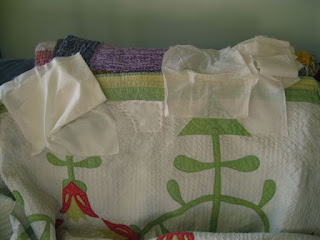
It had been mounted on the wall with a velcro strip. It looks like the movers just pulled straight down, and the quilt gave way just under the velcro. Also, the area marked with a safety pin in the photo suffered many small tears.


My first step was to remove the velcro. For one reason, it was in the way of patching the tear. Also, the owner agreed that while I was at it, it would be a good idea to remove and re-mount the whole piece of velcro. It had been machine sewn, and I wanted to re-attach it by hand with a muslin strip between the velcro and the quilt, as I usually do it.
I sewed a large-ish herringbone stitches on both front and back to hold the edges of the tear in place while I did the actual repairs.

The first step was to patch the back. The patch is longer than the main tear, because there were lots of tiny tears and weak spots on both sides of the quilt.

The next step was to patch the white area on the front with all the little tears. This proved problematical for a several reasons. Firstly, matching old whites is always tricky. (See a previous post on this topic.) I auditioned several, and as is usual with whites, the best choice ended up being the least worst.


Next problem was that this is a fairly sheer cotton, so the little rips showed through as little grey shadows. Putting on a double-layer patch would have made the patch way too white. So I basted tiny bits of fabric into the rips.

Next problem, as is usual with patching into a background, is that there are no built-in edges at which to camouflage the edges of the patch. Sometimes, I like to insert a fabric into the hole and reverse applique, but these holes were too small and the quilting too dense (normally such a wonderful thing). Next best is to end the patch along quilting lines. I could do that mostly, but decided on one straight edge rather than extending the patch pretty far along the quilting.
Here's the final look.

The next job was mending the yellow border on the front. This was also problematical, the yellow having faded, not to a pure pale butter yellow, but to a pale greenish yellow. I found a wonderful, but way too bright, greenish yellow. I hung a piece of it in the living room window for a couple of weeks, but it only faded a tiny bit, so I left it there and kept thinking.
I decided to try bleach the patch fabric to a softer color, which really is always a last resort for me. It's so unpredictable, and requires absolutely thorough washing after bleaching, and I still don't feel comfortable. Sadly, even a super quick dip in bleach-water solution took the greenish tint right out, leaving the yellow I was trying to avoid. A longer bleach produced a brownish yellow, but at least not too bright.
I then tried a modern version of acid green. Even though it started out closer in color to the green border, the bleach took it kind of closer to the yellow color.
But none of my swatches looked alright in both daylight and artificial light. Usually, I try to find a happy medium, but these colors were obstinate. What was passable-maybe in one lighting was horrendous in the other. The next photos show, from left to right, the yellow fabric and two levels of bleaching, and then the green fabric and two levels of bleaching. The top photo is in artificial light. The bottom ones are daylight on different days. I really wanted to make this poor, wounded quilt look as good as possible. Frustrating!


So I fretted.
And then one day, woke up with a lightbulb over my head. All it took was a tiny step outside the box.
This quilt is square, and the design has no "up". I realized that I could hang it from one of the other edges, taking away the need for such a sturdy patch. With the torn edge on the bottom, I could "just" insert a base, stitch across the tears, and have a nice, not-so-obvious mend!
It was definitely a "Well, Duh" moment.
I removed a tiny bit of the quilting (and secured the loose thread ends) so I could insert a bit of stronger, new fabric inside the tear. I re-quilted and sewed couching stitches across the area. Simple, sweet, and done!


Then I sewed the velcro onto the opposite edge. I machine stitch velcro down the center of a muslin strip, then hand stitch through the muslin with a large zig-zag though all layers. On the front there are horizontal 1/4" stitches.

With matching threads, the stitches on the front barely show. It's a much stronger mounting that stitching just into the back fabric.

Needless to say, this quilt is a real treasure, combining age (mid-19th century), family history, lovely design, and superior needlework.


Several of the pieces give evidence of the two-step green dyeing process of the era. Possibly from uneven dyeing, some places are just blue, and one is just yellow.


The binding has faint remnants of a print, especially on the reverse, which got a bit less light exposure and fading.

What an absolute treat it's been to have this beauty in my studio for a while!
You did a wonderful job. The quilt is spectacular.
ReplyDeleteThanks! Yeah, it's definitely a top-notch beauty.
DeleteSo thankful to have this beautiful quilt repaired to its glory and back to warm our home. Thank you, Ann, for treating it with the love it deserves and for caring for it as if it were your own.
ReplyDeleteThanks for the lovely comment. It was a joy to have such a wonderful quilt come and visit me for a while! (And I apologize for responding so late - blog comments were not coming through to me for a while due to a glitch.)
Delete