
 ------->
My daughter Katrina came to me last spring, asking me to be an advisor for a wedding dress one of her best friends had asked her to make. Of course I would! We have known Hannah, the bride, and her family since the grade school years.
What ended up happening was two long and intense and super fun weekends of dress planning and construction. And after that, a most wonderful wedding!
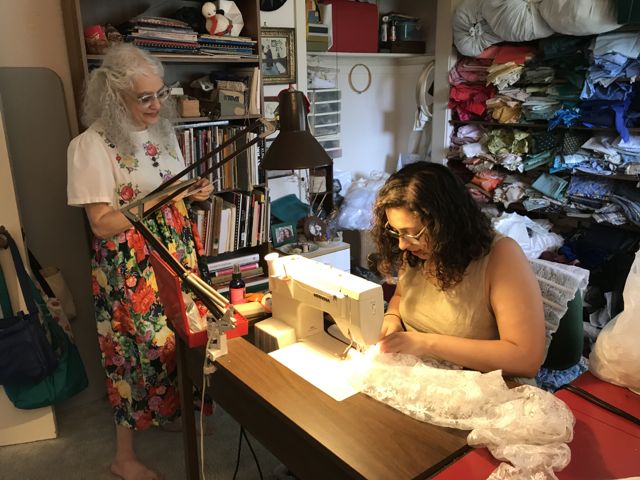
Here's the production team: bride, mother of the bride, and my daughter. It really did take all four of us for all the brainstorming, remembering of details, and the actual cutting, fitting, and sewing. While we all know how to sew, not one of us is experienced with this kind of fancy gown. We each had a different skill set to bring to the project. The bride's mother did double duty, also keeping us fed with her delicious culinary skills. We just had the best time!

Planning started with Hannah searching online for style ideas. Her ideal was to use organic and sustainable fabrics, but she was having trouble finding an organic lace that she liked. Then her mom offered up her own wedding dress which had tons of lace. The idea of re-purposing the lace fit Hannah's sustainability wishes just fine, and we were off to the races!
Here's the original 1980s dress. The lace had been chosen by the bride's grandmother, so using it brought another generation into the process. How lovely!

Our first sewing session was in mid-May. Hannah and Katrina no longer live in the same city, so their old hometown here became the rendezvous point. Here's how we started - patterns, laces, and fabrics - many choices to make.

We ended up choosing the strapless gown from one pattern with a trim of old lace at the hem, and a short tunic from another pattern, to be made from the old lace.
First step was to make a muslin for fitting. That was made with organic voile. Measuring, twiddling with the sizing, and then cutting and stitching. (Yes, folks, those are soup can pattern weights!)


The fitting went smoothly enough that we were able to use the muslin for the lining of the actual dress. Cool!
Next step was a shopping spree for the appropriate foundation garment which turned out to be a basque. We also bought silk to make the actual dress. And then made the dress "again", this time with slippery silk and boning in the bodice.
Stop the presses! The silk dress with the voile lining was too sheer for comfort. So we took the satin underdress from the old dress, took off the deep lace flounce, cut off the bodice just under the armholes, and stitched it into the bodice seam as well. This almost made the dress too tight, but when we put the original darts back into the old satin, that helped the fit a lot.
We also cut a fitting muslin for the tunic from an old sheet. Katrina took that back to Philly with her to stitch up before our next production session.
So by the end of four 12-hour days, we had a lined dress mostly constructed. It was ready for the (dreaded) zipper, hemming, and adding lace at the hem.... and figuring out how to keep the strapless bodice up securely.... Just a few more little things.... Oh, and also there'd be making the tunic...

We met again two months later. The zipper went in mostly easily (do zippers ever go in totally easily?!) and "just" needed some hand tweaking at the bottom. We decided on using lots of snaps to keep the dress up, i.e. snapped it right onto the basque. We also added ribbon hanging loops.

We did some fitting with the tunic muslin, including noticing that the shoulders were too wide. I pulled out a great book that I bought at a rummage sale - Fantastic Fit For Everybody: How to Alter Patterns to Flatter Your Figure by Gale G. Hazen. We made tucks as the book suggested in the muslin, and the tunic looked great! The muslin then was taken apart and became the pattern for cutting the lace.

Next step was cutting the lace pieces. We wanted to cut so that the lovely scalloped edges at the bottom of the old tunic and the tightly gathered skirt flounce would end up at the bottom edges of the new tunic and it's sleeves. The blue outlines below show how we placed the pattern pieces. We cut the sleeves out of the old tunic front and back, and the bodice pieces out of the flounce that had been taken off the old underdress. (Imagine that the old gathered lace flounce had become a long piece of flat lace underneath all three bodice outlines.) In both cases, there was just barely enough fabric, sometimes just a 1/2" to spare at a couple of corners. Phew!

We even managed to arrange the pattern pieces so that the scallops met gracefully at the side seams!

Constructing the tunic was tricky because the lace has subtly different right and wrong sides. We also made a narrow silk binding for the neck edge, and attached button loop tape to the back closure. I found just enough tiny antique mother-of-pearl buttons in my button boxes.
Then the hem. I did this to myself. I came up with the idea that we could attach the scalloped edge of the old lace flounce to the voile lining, ending at the target length for the dress ... and then hem the silk dress a little shorter, so it would look like there was a lace petticoat showing at the bottom. Lovely idea, but entailed yet more head scratching and math!


We put the bride up on a stool and measured for both hems.

The lace went onto the voile by machine. We needed about 130", and the old flounce gave us only a few extra inches. We figured that we'd never get the scallops to join neatly there, so Katrina just stitched the strip on. It ended up only about 1/2" off, i.e. as good as a match. We figure that Hannah's grandmother was watching carefully over her lace and helped it all work out for us - her gift to the wedding!
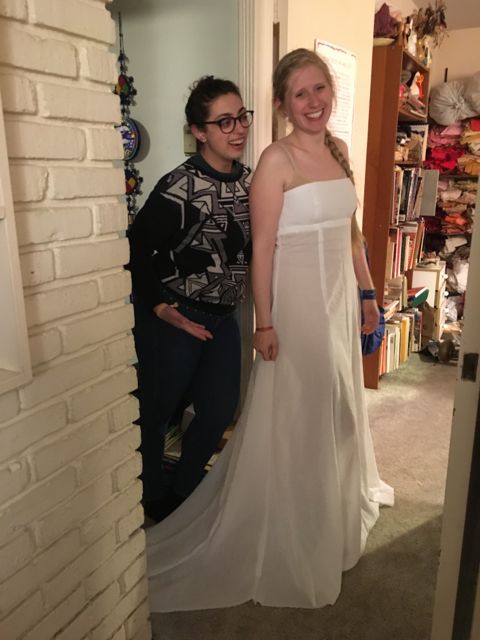
Here's Hannah, a little astonished to see an actual bride in the mirror!

Then Hannah took the dress home to hem the silk by hand and put all the tiny buttons onto the tunic.

And voila! A wedding! This was definitely the most fun, most creative, and most heartwarming sewing project ever!


Wow!
ReplyDeleteSuch a beautiful wedding dress but I never suspected how complex the construction process could be. Congratulations to all the seamstresses and, of course, the bride and groom.
Joanne in Massachusetts
Thanks, Joanne! It always seems to me that the bulk of the thought and work of sewing clothing is in the fit and the details. And there's a whole lot of details in a special dress like this!
Delete