
subtitle: When the Living Room Becomes a Video Studio
sub-subtitle: You're all invited to my Preserving Our Quilt Legacy Virtual Workshop. We'll be discussing vintage and antique quilt repair and care. The full description and registration on my website.
So. Running a virtual workshop requires the acquisition of a few new skills. Well, more than a few.
For me, it required my whole family - programmer husband who figured out all the tech, video editor son who shared what he knows about lighting and production and also edited the videos, virtual yoga teacher daughter who shared all her Zoom experience and tips. (Note that as part of my workshops, she teaches a yoga "hand and shoulder and neck" set to rejuvenate after long sewing sessions).Zoom
First, I learned more about Zoom, having never done more than just chat with friends. Most important was learning how to do Share Screen for slide lectures. It's not too difficult in the end, but did take my husband's help with learning how to format the slide show files, and then practice to get smooth at the transitioning.
Video Recording
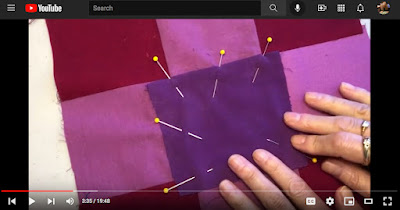
Next, I learned how to record videos. The photo below shows my studio set-up for that part. Ambient light from my lovely, huge living room window - in early afternoon after direct sun has passed (to avoid harsh shadows) but light is still at its brightest. I add light with a ceiling bounce from a torchiere that is off-screen to the right. Elbow lamp directly above stitching samples. Camera on tripod also leaning over-ish the stitching samples. Phone mic for my explanations. Other sewing samples off-camera waiting their turn. Sewing supplies also off-camera.

Live Demos
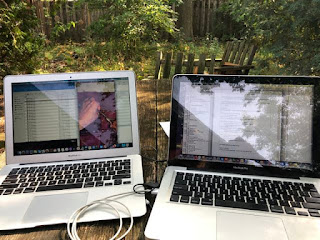
And finally in the next photo, is the most massive set-up. This is for live stitching demos. Complicated, but that’s why I labeled the photo, for future reference as well as giggles. (Enlarge photo to read.)
My husband found an app called Camo that takes the video and audio
input from the phone camera to the computer in a format that can
broadcast over Zoom. It had a pretty short learning curve and is free -
and worked much better than we expected from a free app. It's not much
more difficult than switching into Share Screen. That's saying a lot,
because picking up new tech is most definitely not my forté.

DIY Equipment
The best part is my husband’s chopstick lamp mounting technique. So here's how that came about....the switch on the elbow lamp that I was using in the first photo for overhead lighting broke. (It was probably about 40 years old.) I ordered another elbow lamp which didn't arrive in time for the next class session. So, we substituted what they call a "clamp light" (I'd bought a few when I was first getting started figuring this all out - they are what my daughter uses to teach her virtual yoga classes). They clamp onto furniture rather than having a base. We chose an old pole lamp so the light could hang over the sewing area like the elbow lamp had. But the lamp wouldn't stay steady clamped to a vertical support. So my husband devised this ingenious use of a chopstick and duct tape. Once again, we see that duct tape is key to solving any problem.

Are you curious about what's hanging under the lamp? The biggest new thought about lighting that I learned from my son is the necessity of light diffusers - they make for softer, less distracting shadowing. They make all the difference. When I’ve recorded at night, i.e. without the sun, I put out another can light or two, clipped to chair backs, and bounce their light off the ceiling. This is kind of another way to get diffused lighting.
This particular diffuser is another homemade item. We'd gotten a new microwave last spring, and I'd saved the plastic ring that sits underneath the turntable from the old microwave, just because...well, you never know when you might need a plastic ring. I basted a folded piece of organza (eight layers) to the ring, and hung the ring from the lamp with large paperclips and bulldog clips. I'm quite proud of my cobbled together design!
Lighting
The nice thing is that, since I'm using all LED bulbs, there's low heat and no huge electric draw, no blown fuses. I researched a bit and found that there is a rating system for how closely bulbs approximate daylight. I bought the highest rated I could find (a hardware store item, no speciality shopping needed): Enhance bulbs by Feit. They rate over 90 on the CRI, Color Rendering Index. I find them still yellower that I'd have expected given all the write-ups, but not distractingly so.
The next huge lessons came in making voiceovers for the set of technique videos. The first time out, I tried recording video and audio at the same time. It wasn't very successful, as I am not good at memorizing scripts, and can't sew and check the scripts at the same time.
So the second time out, I first recorded for the video. But I also talked all the way through, mostly ad hoc, as a way to be sure I had enough video time to cover what I was saying. Then, yes, I sat and transcribed my words and edited into full sentences and getting the content right. Luckily, I was doing all this in the summer and able to sit outside in pleasant weather.
Then, I set up one laptop to run the video and one to scroll through my scripts, and used the phone mic to record the audio. This, I did upstairs, at night, phone ringers turned off. I neglected to take a photo of that set up.
My wonderful son then joined the audio and video and, ta-da, a pretty good set of how-to videos. And, quite honestly, a process I hope to never have to re-do. These videos are "it", folks.
YouTube Videos
My next adventure is beginning: Making occasional YouTube videos to help find a larger audience. These will not be as formal as the technique videos, so I'm already pretty sure I can do the recording just fine. I may learn to do the simpler editing that this will need.
It all worked! And I like that I didn’t spend a bundle on fancy equipment. The homegrown quality of this fits my personality and reduce/reuse values quite well. My son’s advice set well with me: I’m not trying to sell myself as a video producer - I’m trying to sell my quilt repair and care content. So as long as the lighting, clarity, sound, etc. let my students see what I'm doing, I’m fine. (The phone camera is amazing on those counts!) Ta-da!
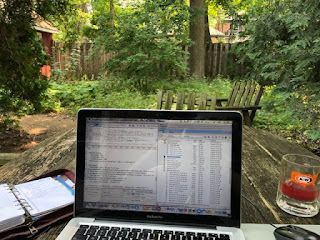
And....for a giggle at the end: Here's my outdoor office on another day, this time editing my website. Of special note is one of my vintage A&W root beer mugs. I bet you can guess why I have bought a few here and there.
Thanks, Ann. This is terrific! At the bare minimum it lets people know how hard you work to make your productions. I love the duct tape and chopstick! Great tip about light diffusers. Your Youtube video is perfect. You go, girl!
ReplyDeleteThanks, Karla! I'm happy to be on this video-making adventure together. On the one hand, it's more complex than I knew, and on the other, it's pretty cool how much tech and software there is out there so that my family can teach a non-techie like me to do stuff.
Delete